AIStore & ETL: Using AIS/PyTorch connector to transform ImageNet (post #2)
The goal now is to deploy our first ETL and have AIStore run it on each storage node, harnessing the distributed power (and close to data - meaning, fast). For the problem statement, background and terms, please see the previous post:
To quickly get to the point, we’ll assume that an instance of AIStore has been already deployed on Kubernetes.
Check out our dedicated ais-k8s repository for the multiple easy ways to accomplish Kubernetes deployments. For a quick local deployment without the operator, refer to deploy/dev/k8s.
We’ll be using PyTorch’s torchvision to transform ImageNet dataset - as illustrated:

Also, in the examples below you’ll notice ais command. That’s AIStore’s CLI tool providing unmatched (well, almost) convenience and ease-of-use. Most of the time, though, we’ll show the equivalent curl.
For a variety of practical reasons,
curlproves to be handly in use cases - inbashand Python scripts on the client side. Big part of that is its (i.e., thecurl’s) ubiquitous nature. Great tool, overall.
The Dataset
The dataset we have here is derived from the original ImageNet and is only slightly different. Its training part exists under a train/ directory, validation - under val/. Each *.jpg image has a corresponding *.cls object with the corresponding class number. Image are assigned to one of the 1000 classes; classes are represented as integers in the [0 - 999] range:
$ ais ls ais://imagenet
NAME             SIZE
train/0000353.cls     1B
train/0000353.jpg     17.88KiB
...
val/1280048.cls       3B
val/1280048.jpg       82.78KiB
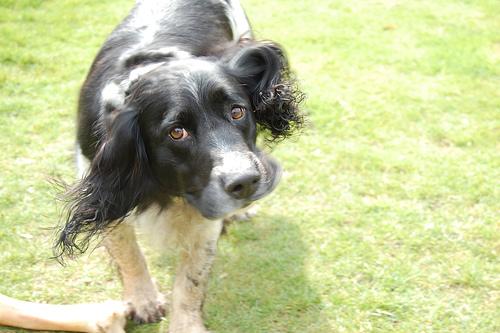
A random (non-transformed) image from the dataset (and again, notice ais CLI usage):
$ ais get ais://imagenet/train/0278350.jpg
$ open 0278350.jpg
And the associated class:
$ ais object cat ais://imagenet/train/0278350.cls
217
The Plan and the Code
The plan, essentially, is two-fold:
- Deploy provided transformation code (called
code.pybelow) as ETL K8s container aka transformer. - Drive transformer from the PyTorch-based client to transform requested objects (shards) as required.
In the end, each image from the dataset, before it reaches the model, goes through a series of the following (code.py) transformations:
# `code.py`:
import io, sys
import torch
from PIL import Image
from torchvision import transforms

def img_to_bytes(img):
    buf = io.BytesIO()
    img = img.convert('RGB')
    img.save(buf, format='JPEG')
    return buf.getvalue()

preprocessing = transforms.Compose([
    transforms.RandomResizedCrop(224),
    transforms.RandomHorizontalFlip(),
    transforms.ToTensor(),
    transforms.Normalize(mean=[0.485, 0.456, 0.406], std=[0.229, 0.224, 0.225]),
    transforms.ToPILImage(),
    transforms.Lambda(img_to_bytes),
])

if __name__ == "__main__":
    input_bytes = sys.stdin.buffer.read()
    image = Image.open(io.BytesIO(input_bytes)).convert('RGB')
    processed_bytes = preprocessing(image)
    sys.stdout.buffer.write(processed_bytes)
Initializing
We will use python3 (python:3.9) runtime to install torch and torchvision packages.
To make sure that code.py (above) can have its imports, the following (deps.txt) dependencies must be installed:
torch==1.6.0
torchvision==0.7.0
With transforming code and dependencies covered, we are now fully ready to initialize ETL in the cluster:
$ ais etl init code \
  --name my-first-etl \
  --from-file code.py \
  --deps-file deps.txt \
  --runtime python3 \
  --comm-type io://
Notice the “elements” of this ais command:
- user-given name of the specific (
code.py) transformation; - the dependencies;
- the aforementioned
runtime, and, finally - --comm-type(“communication type”) option briefly already mentioned - and we’ll discuss it in-depth in our future postings.
Two ways to check that ETL is up and running: ais CLI (“way”) and kubectl:
$ ais etl list
NAME
my-first-etl

$ kubectl -n ais get pods | grep ‘my-first-etl’
ais   my-first-etl-iacjhrvc                            1/1     Running   0          50s
Recap what we just did:
- We prepared Python3 code (
code.py) and provided dependencies (deps.txt) to run it. - We started transformer in the AIS cluster to, subsequently, augment images from the ImageNet dataset.
Transforming a single object
To get a single object, we will use the AIStore’s CLI, and we will show equivalent curl commands which can be useful in certain situations.
Those commands are convenient for quick testing and specific solutions which are written e.g. in bash.
The original image:
$ ais get ais://imagenet/train/0278350.jpg 0278350.jpg

# Equivalent `curl`:
$ curl -O 0278350.jpg https://aistore/v1/objects/imagenet/train/0278350.jpg
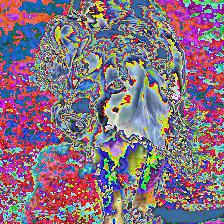
and, the image after the transformation:
$ ais etl object my-first-etl ais://imagenet/train/0278350.jpg 0278350.jpg

# Equivalent `curl`:
$ curl -O 0278350.jpg https://aistore/v1/objects/imagenet/train/0278350.jpg?uuid=my-first-etl
Notice that the only difference between these two curl (and, respectively, ais) commands above - is the uuid parameter referencing existing and available (my-first-etl) transformation that we have just previously initialized.
Post-transform 0278350.jpg image:
AIS/PyTorch connector
So far we have set up ETL and tried our first cluster-resident transformations. We can now start running a real training model. For this purpose, we have prepared a slightly modified version of the PyTorch ImageNet example that can be found here. The script contains training and validation code for the ImageNet dataset.
Next step is to modify the script to utilize my-first-etl transformer.
The typical code for loading ImageNet from a local directory looks like this:
normalize = transforms.Normalize(mean=[0.485, 0.456, 0.406], std=[0.229, 0.224, 0.225])

train_loader = torch.utils.data.DataLoader(datasets.ImageFolder(
       os.path.join(args.data, 'train'),
       transforms.Compose([
           transforms.RandomResizedCrop(224),
           transforms.RandomHorizontalFlip(),
           transforms.ToTensor(),
           normalize,
       ]),
    ),
    batch_size=args.batch_size, shuffle=True,
    num_workers=args.workers, pin_memory=True)

val_loader = torch.utils.data.DataLoader(datasets.ImageFolder(
       os.path.join(args.data, 'val'),
       transforms.Compose([
           transforms.Resize(256),
           transforms.CenterCrop(224),
           transforms.ToTensor(),
           normalize,
       ]),
    ),
    batch_size=args.batch_size, shuffle=False,
    num_workers=args.workers, pin_memory=True)
Full code for the example above is also available - see ImageNet PyTorch training with
dataset.ImageFolder.
In the world of PyTorch, all datasets are subclasses of torch.utils.data.Dataset with torchvision.datasets.ImageFolder being the standard for handling datasets with labeled images.
To integrate with PyTorch and offload transformations to AIStore, we introduce aistore.pytorch.Dataset - the implementation of torch.utils.data.Dataset.
With aistore.pytorch.Dataset, the example above works out as follows:
import aistore
from aistore.client import Bck

...

train_loader = torch.utils.data.DataLoader(
    aistore.pytorch.Dataset(
        "http://aistore-sample-proxy:51080", # AIS IP address or hostname
	Bck("imagenet"),
        prefix="train/", transform_id="my-first-etl",
        transform_filter=lambda object_name: object_name.endswith('.jpg'),
    ),
    batch_size=args.batch_size, shuffle=True,
    num_workers=args.workers, pin_memory=True)

val_loader = torch.utils.data.DataLoader(
    aistore.pytorch.Dataset(
        "http://aistore-sample-proxy:51080", # AIS IP address or hostname
	Bck("imagenet"),
        prefix="val/", transform_id="my-second-etl", # We skipped setting up this ETL.
        transform_filter=lambda object_name: object_name.endswith('.jpg'),
    ),
    batch_size=args.batch_size, shuffle=False,
    num_workers=args.workers, pin_memory=True)
Complete code is available here:
References
- AIStore & ETL: Introduction
- GitHub:
- Documentation, blogs, videos:
- https://aiatscale.org
- https://github.com/NVIDIA/aistore/tree/main/docs
PS. Note that we have omitted setting-up ETL for the validation loader - leaving it as an exercise for the reader. To be continued...