AUTHN
The AIStore Authentication Server (AuthN) provides secure access to AIStore by leveraging OAuth 2.0 compliant JSON Web Tokens (JWT).
NOTE: AuthN is under development and has NOT gone through a complete security audit. Please review your deployment carefully and follow our security policy to report any issues.
For more details:
- Introduction to JWT
- Go implementation of JSON Web Tokens used for AuthN.
Key Features
- Standalone Server: AuthN operates independently, managing users and tokens separately from the AIStore servers (aisnodes) in the cluster.
- Secure Tokens: Currently, AuthN supports HMAC (hash-based message authentication) using the SHA256 hash.
- Client Workflow: If AuthN is enabled on a cluster, users must log in to receive a token from AuthN. This token must be included in subsequent HTTP requests to the AIS cluster. Requests without a valid token are rejected by AuthN-enabled AIS clusters.
Typical Workflow
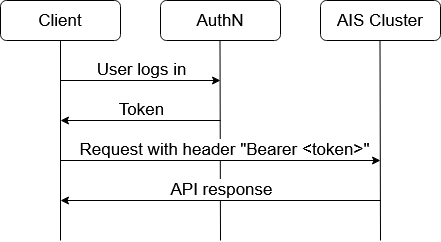
- User logs in: The client sends login credentials to AuthN.
- Token Issuance: AuthN issues a token to the client.
- Authenticated Requests: The client includes the token in the request headers (
Authorization: Bearer <token>) for subsequent API requests to the AIStore cluster. - API Response: The cluster processes the request and responds.
Protocols
AuthN supports both HTTP and HTTPS protocols. By default, AuthN starts as an HTTP server listening on port 52001. For HTTPS, ensure the configuration file options server_crt and server_key are correctly set to the SSL certificate and key paths.
AuthN generates tokens that are self-sufficient, meaning a proxy does not need to contact AuthN to check permissions. AIStore clusters should be registered with the AuthN server. This allows AuthN to broadcast revoked tokens to all registered clusters, ensuring they update their blacklists accordingly.
Table of Contents
Getting Started
In this section, we use AIStore Local Playground. This is done for demonstration purposes, as it’s easy to use and reproduce.
If you already have an AIS cluster deployed and just want to add AuthN to it for authentication and access control, follow these instructions.
To deploy a new local AIS cluster with AuthN enabled, follow these steps:
- Optionally, shutdown and cleanup any existing Local Playground deployments:
make kill clean
Note: When deploying AIStore with AuthN, an
adminuser is created by default withadminprivileges.The default password for the
adminuser must be set with the environment variableAIS_AUTHN_SU_PASS.For the list of environment variables, refer to the Environment and Configuration section below.
- Deploy the cluster with AuthN enabled and the required environment variables :
AIS_AUTHN_ENABLED=true AIS_AUTHN_SU_PASS="adminpass" AIS_AUTHN_SECRET_KEY="demoSecretKey" make deploy
This will start up an AIStore cluster with the AuthN server.
Initial Setup and Authentication
After deploying the cluster, you won’t be able to access it without authentication:
ais cluster show
Error: token required
- Login as Admin:
ais auth login admin -p admin Logged in (/root/.config/ais/cli/auth.token) - View Registered Clusters:
ais auth show cluster CLUSTER ID ALIAS URLs - Add Your Cluster:
ais auth add cluster mycluster http://localhost:8080 - Confirm Cluster Registration:
 ais auth show cluster
 CLUSTER ID  ALIAS       URLs
 eTdL4YGHN   mycluster   http://localhost:8080
Note:
http://localhost:8080address (above) is used for purely demonstration purposes and must be understood as a placeholder for an arbitrary AIStore endpoint (AIS_ENDPOINT).
Default Roles and Permissions
When a cluster is registered, a set of default roles are created:
ais auth show role
ROLE                          DESCRIPTION
Admin                         AuthN administrator
BucketOwner-mycluster         Full access to buckets in eTdL4YGHN[mycluster]
ClusterOwner-mycluster        Admin access to eTdL4YGHN[mycluster]
Guest-mycluster               Read-only access to buckets in eTdL4YGHN[mycluster]
Admins have superuser permissions and can perform all roles in the cluster.
Enable CLI Auto-Completion
Ensure that you have auto-completions enabled for the AIS CLI:
make cli-autocompletions
You can use <TAB-TAB> to view a list of possible options:
$ ais auth add role role_name <TAB-TAB>
ro               GET              DESTROY-BUCKET   PATCH            PROMOTE          APPEND           SET-BUCKET-ACL
rw               HEAD-OBJECT      MOVE-BUCKET      PUT              HEAD-BUCKET      MOVE-OBJECT      LIST-BUCKETS
su               LIST-OBJECTS     ADMIN            DELETE-OBJECT    CREATE-BUCKET    UPDATE-OBJECT    SHOW-CLUSTER
Example Workflow
- Create a Bucket and Add an Object:
ais bucket create ais://nnn "ais://nnn" created ais put README.md ais://nnn PUT "README.md" => ais://nnn/README.md - Create a Role and User:
- Create a role that can only list buckets and objects:
ais auth add role list-perm --cluster mycluster --desc "Users with this role can only list buckets and objects" LIST-OBJECTS LIST-BUCKETSFor a comprehensive list of permissions, see the Permissions section below.
- Add a user named
alicewith this role:ais auth add user alice -p 12345 list-perm
- Create a role that can only list buckets and objects:
- Login as the New User and Save the Token:
ais auth login alice -p 12345 -f /tmp/alice.token Logged in (/tmp/alice.token) - Perform Operations with Limited Permissions:
- List buckets and objects:
AIS_AUTHN_TOKEN_FILE=/tmp/alice.token ais ls AIS_AUTHN_TOKEN_FILE=/tmp/alice.token ais ls ais://nnn - Attempt restricted actions (which will fail due to permissions):
  AIS_AUTHN_TOKEN_FILE=/tmp/alice.token ais get ais://nnn/README.md -
  Error: http error code 'Forbidden', bucket "ais://nnn"
- List buckets and objects:
Further references:
- See CLI auth subcommand for all supported command line options and usage examples.
Environment and Configuration
Environment variables used by the deployment script to set up the AuthN server:
| Variable | Default Value | Description |
|---|---|---|
AIS_AUTHN_ENABLED |
false |
Enable AuthN server and token-based access in AIStore proxy (true to enable) |
AIS_AUTHN_PORT |
52001 |
Port on which AuthN listens to requests |
AIS_AUTHN_TTL |
24h |
Token expiration time. Can be set to 0 for no expiration |
AIS_AUTHN_USE_HTTPS |
false |
Enable HTTPS for AuthN server. If true, requires AIS_SERVER_CRT and AIS_SERVER_KEY to be set |
AIS_SERVER_CRT |
"" |
TLS certificate. Required when AIS_AUTHN_USE_HTTPS is true |
AIS_SERVER_KEY |
"" |
private key for the TLS certificate (above). |
AIS_AUTHN_SU_NAME |
admin |
Superuser (admin) name for AuthN |
AIS_AUTHN_SU_PASS |
None -- required | Superuser (admin) password for AuthN |
AIS_AUTHN_SECRET_KEY |
"" |
Secret key used to sign tokens. |
All variables can be set at AIStore cluster deployment and will override values in the config. Example of starting a cluster with AuthN enabled:
AIS_AUTHN_ENABLED=true AIS_AUTHN_SU_PASS="password" AIS_AUTHN_SECRET_KEY="keyForSigningTokens" make deploy
Note: The secret key used to sign tokens and the admin password MUST be provided to deploy and cannot be changed without restarting the cluster.
- More info on env vars:
api/env/authn.go
Separately, there’s also client-side AuthN environment that includes:
| Name | Description |
|---|---|
AIS_AUTHN_URL |
Used by CLI to configure and query the authentication server (AuthN). |
AIS_AUTHN_TOKEN_FILE |
Token file pathname; can be used to override the default $HOME/.config/ais/cli/<fname.Token>. |
AIS_AUTHN_TOKEN |
The JWT token itself (excluding the file and JSON); can be used to specify the token directly, bypassing the need for a token file. |
Notation
In this README:
AUTHSRV- denotes a (hostname:port) address of a deployed AuthN server (default: http://localhost:52001)
AuthN Configuration and Log
| File | Location |
|---|---|
| Server configuration | $AIS_AUTHN_CONF_DIR/authn.json |
| User database | $AIS_AUTHN_CONF_DIR/authn.db |
| Log directory | $AIS_LOG_DIR/authn/log/ |
Note: When AuthN is running, execute
ais auth show configto find out the current location of all AuthN files.
Permissions
In AIStore, roles define the level of access and the permissions available to users. Here is a detailed explanation of the roles and their associated permissions:
| Permission | Description |
|---|---|
GET |
Read object contents. |
HEAD-OBJECT |
Read object metadata (properties). |
PUT |
Write object. |
APPEND |
Append to object. |
DELETE-OBJECT |
Delete object. |
MOVE-OBJECT |
Move/rename object. |
PROMOTE |
Promote local files. |
UPDATE-OBJECT |
Update object metadata. |
HEAD-BUCKET |
Read bucket metadata (properties). |
LIST-OBJECTS |
List objects in a bucket. |
PATCH |
Set bucket properties. |
SET-BUCKET-ACL |
Set bucket permissions. |
LIST-BUCKETS |
List all buckets in cluster. |
SHOW-CLUSTER |
View cluster information. |
CREATE-BUCKET |
Create new bucket. |
DESTROY-BUCKET |
Destroy/delete bucket. |
MOVE-BUCKET |
Move/rename bucket. |
ADMIN |
Full administrative access: all cluster operations. |
ro |
Bucket read-only: GET, HEAD-OBJECT, HEAD-BUCKET, LIST-OBJECTS. |
rw |
Bucket read-write: ro + PUT, APPEND, DELETE-OBJECT, MOVE-OBJECT, PROMOTE. |
su |
Super-user: full access to all operations. |
How to Enable AuthN Server After Deployment
By default, the AIStore deployment does not launch the AuthN server. To start the AuthN server manually, follow these steps:
- Build AuthN:
make authn - Create a Configuration File:
You will need a configuration file similar to the following:
$ cat $HOME/.config/ais/authn/authn.json { "log": { "dir": "/tmp/ais/authn/log", "level": "3" }, "net": { "http": { "port": 52001, "use_https": false, "server_crt": "", "server_key": "" } }, "auth": { "secret": "aBitLongSecretKey", "expiration_time": "24h" }, "timeout": { "default_timeout": "30s" } } - Start the AuthN Server:
Start the AuthN server in a new terminal or screen session. Ensure that
authn.jsonexists in the configuration directory.authn -config=<authn_config_dir> - Configure AIStore Cluster to Enable Token-Based Access:
Change the AIStore cluster configuration to enable token-based access.
ais config cluster auth.enabled true - Verify Access:
Now, you cannot access the cluster without tokens:
ais ls Error: token required - Login as Admin:
To continue operations, log in as the admin user:
ais auth login admin -p admin Logged in (/root/.config/ais/cli/auth.token) - Register the Cluster with AuthN:
Register the AIStore cluster at AuthN to receive AuthN messages (e.g., revoked token list):
ais auth add cluster mycluster http://localhost:8080 - Proceed with Cluster Operations: After registering, you can proceed using your cluster with admin privileges. You can add users, set up roles, etc.
Note: This example assumes that AuthN is running on the same host as the AIS cluster. If AuthN is running on a different host, you will need to specify the
AIS_AUTHN_URLvariable. For example, useAIS_AUTHN_URL=http://10.10.1.190:52001 ais auth COMMAND.
Goes without saying that localhost:8080 (above) can be replaced with any legitimate (http or https) address of any AIS gateway. The latter may - but not necessarily have to - be specified with the environment variable AIS ENDPOINT.
REST API
Authorization
After deploying the cluster, a superuser role admin and admin account are created automatically.
Only users with the admin role can manage AuthN. Every request to AuthN (except login) must contain an authentication token in the header:
Authorization: Bearer <token-issued-by-AuthN-after-login>
For curl, it is an argument -H 'Authorization: Bearer token'.
Tokens
AIStore gateways and targets require a valid token in a request header - but only if AuthN is enabled.
Every token includes the following information (needed to enforce access permissions):
- User name
- User ACL
- Time when the token expires
To pass all the checks, the token must not be expired or blacklisted (revoked).
Revoked Tokens
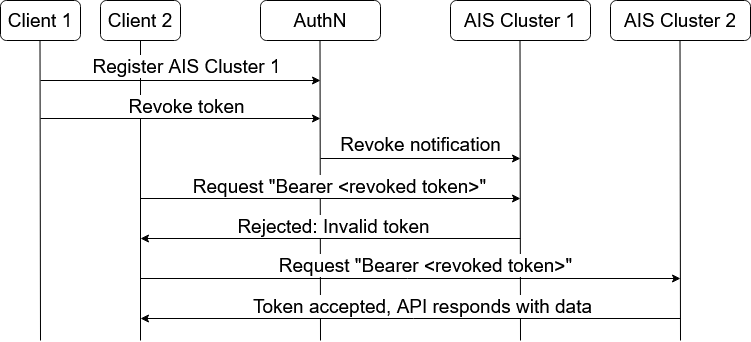
AuthN ensures that all AIS gateways (proxies) are updated with each revoked token. When AuthN registers a new cluster, it sends the cluster the entire list of revoked tokens. Periodically, AuthN will clean up the list and remove expired and invalid tokens.
See the following example workflow below, where a token is revoked and only one cluster is registered. “AIS Cluster 2” is unregistered and allows requests with revoked token:
Expired Tokens
Generating a token for data access requires a user name and user password.
By default, the token expiration time is set to 24 hours.
Modify expiration_time in the configuration file to change the default expiration time.
To issue a single token with a custom expiration time, pass an optional expiration duration in the request. Example: generate a token that expires in 5 hours (in nanoseconds). API:
POST {"password": "password", "expires_in": 18000000000000} /v1/users/username
CLI:
ais auth login -p password username -e 5h
Pass a zero value "expires_in": 0 to generate a token with no expiration.
AuthN returns the generated token as a JSON formatted message. Example: {"token": "issued_token"}.
The revoke token API shown below will forcefully invalidate a token before it expires.
Call revoke token API to forcefully invalidate a token before it expires.
| Operation | HTTP Action | Example |
|---|---|---|
| Generate a token for a user (Log in) | POST /v1/users/<user-name> | curl -X POST $AUTHSRV/v1/users/<user-name> -d '{"password":"<password>"}' |
| Revoke a token | DELETE /v1/tokens | curl -X DELETE $AUTHSRV/v1/tokens -d '{"token":"<issued_token>"}' -H 'Content-Type: application/json' |
Clusters
When a cluster is registered, an arbitrary alias can be assigned to the cluster. The CLI supports both the cluster’s ID and the cluster’s alias in commands. The alias is used to create default roles for a newly registered cluster. If a cluster does not have an alias, the role names contain the cluster ID.
| Operation | HTTP Action | Example |
|---|---|---|
| Get a list of registered clusters | GET /v1/clusters | curl -X GET $AUTHSRV/v1/clusters |
| Get a registered cluster info | GET /v1/clusters/cluster-id | curl -X GET $AUTHSRV/v1/clusters/cluster-id |
| Register a cluster | POST /v1/clusters | curl -X POST $AUTHSRV/v1/clusters -d '{"id": "<cluster-id>", "alias": "<cluster-alias>", "urls": ["<http://host:port>"]}' -H 'Content-Type: application/json' -H 'Authorization: Bearer <token>' |
| Update a registered cluster | PUT /v1/clusters/<cluster-id> | curl -X PUT $AUTHSRV/v1/clusters/<cluster-id> -d '{"id": "<cluster-id>", "alias": "<cluster-alias>", "urls": ["http://host:port"]}' -H 'Content-Type: application/json' -H 'Authorization: Bearer <token>' |
| Delete a registered cluster | DELETE /v1/clusters/<cluster-id> | curl -X DELETE $AUTHSRV/v1/clusters/<cluster-id> -H 'Authorization: Bearer <token>' |
Roles
| Operation | HTTP Action | Example |
|---|---|---|
| Get a list of roles | GET /v1/roles | curl -X GET $AUTHSRV/v1/roles |
| Get a role | GET /v1/roles/<role-name> | curl -X GET $AUTHSRV/v1/roles/<role-name> |
| Create a new role | POST /v1/roles/ | curl -X POST $AUTHSRV/v1/roles/ -d '{"name":"<role-name>","desc":"<role-desc>","clusters":[{"id":"<cluster-id>","perm":"<permission-number>"}],"buckets":[{"bck":{"name":"<bck-name>","provider":"<bck-provider>","namespace":{"uuid":"<namespace-id>","name":""}},"perm":"<permission-number>"}],"admin":false}' -H 'Content-Type: application/json' -H 'Authorization: Bearer <token>' |
| Update an existing role | PUT /v1/roles/<role-name> | curl -X PUT $AUTHSRV/v1/roles/<role-name> -d '{"name":"<role-name>","desc":"<role-desc>","clusters":[{"id":"<cluster-id>","perm":"<permission-number>"}],"buckets":[{"bck":{"name":"<bck-name>","provider":"<bck-provider>","namespace":{"uuid":"<namespace-id>","name":""}},"perm":"<permission-number>"}],"admin":false}' -H 'Content-Type: application/json' -H 'Authorization: Bearer <token>' |
| Delete a role | DELETE /v1/roles/<role-name> | curl -X DELETE $AUTHSRV/v1/roles/<role-name> -H 'Content-Type: application/json' -H 'Authorization: Bearer <token>' |
Users
| Operation | HTTP Action | Example |
|---|---|---|
| Get a list of users | GET /v1/users | curl -X GET $AUTHSRV/v1/users -H 'Authorization: Bearer <token>' |
| Get a user | GET /v1/users/<user-id> | curl -X GET $AUTHSRV/v1/users/<user-id> -H 'Authorization: Bearer <token>' |
| Add a user | POST /v1/users | curl -X POST $AUTHSRV/v1/users -d '{"id": "<user-id>", "password": "<password>", "roles": "[{<role-json>}]"' -H 'Authorization: Bearer <token>' |
| Update an existing user | PUT /v1/users/<user-id> | curl -X PUT $AUTHSRV/v1/users/<user-id> -d '{"id": "<user-id>", "password": "<password>", "roles": "[{<role-json>}]"' -H 'Authorization: Bearer <token>' |
| Delete a user | DELETE /v1/users/<user-id> | curl -X DELETE $AUTHSRV/v1/users/<user-id> -H 'Authorization: Bearer <token>' |
Note: A user can update their own password without admin privileges by issuing
PUT /v1/users/<user-id>with only thepasswordfield set, authorized with their own token. A user can also retrieve their own user info viaGET /v1/users/<user-id>using their own token.
Configuration
| Operation | HTTP Action | Example |
|---|---|---|
| Get AuthN configuration | GET /v1/daemon | curl -X GET $AUTHSRV/v1/daemon -H 'Authorization: Bearer <token>' |
| Update AuthN configuration | PUT /v1/daemon | curl -X PUT $AUTHSRV/v1/daemon -d '{"log":{"dir":"<log-dir>","level":"<log-level>"},"net":{"http":{"port":<port>,"use_https":false,"server_crt":"","server_key":""}},"auth":{"secret":"aBitLongSecretKey","expiration_time":"24h0m"},"timeout":{"default_timeout":"30s"}}' -H 'Authorization: Bearer <token>' |