AIStore SDK & ETL: Transform an image dataset with AIS SDK and load into PyTorch
Note: This blog post references
init_codewhich has been removed and replaced withinit_class. For the most up-to-date ETL initialization methods, please refer to the init_class documentation.
With recent updates to the Python SDK, it’s easier than ever to load data into AIS, transform it, and use it for training with PyTorch. In this post, we’ll demonstrate how to do that with a small dataset of images.
In a previous series of posts, we transformed the ImageNet dataset using a mixture of CLI and SDK commands. For background, you can view these posts below, but note that much of the syntax is out of date:
- AIStore & ETL: Introduction
- AIStore & ETL: Using AIS/PyTorch connector to transform ImageNet (post #2)
Setup
As we did in the posts above, we’ll assume that an instance of AIStore has been already deployed on Kubernetes. All the code below will expect an AIS_ENDPOINT environment variable set to the cluster’s endpoint.
To set up a local Kubernetes cluster and deploy AIStore on it, checkout the docs here. For more advanced deployments, take a look at our dedicated ais-k8s repository.
We’ll be using PyTorch’s torchvision to transform The Oxford-IIIT Pet Dataset - as illustrated:

To interact with the cluster, we’ll be using the AIS Python SDK. Set up your Python environment and install the following requirements:
aistore
torchvision
torch
The Dataset
For this demo we will be using the Oxford-IIIT Pet Dataset since it is less than 1GB. The ImageNet Dataset is another reasonable choice, but consists of much larger downloads.
Once downloaded, the dataset includes an images and an annotations folder. For this example we will focus on the images directory, which consists of different sized .jpg images.
import os
import io
import sys
from PIL import Image
from torchvision import transforms
import torch

from aistore.pytorch import AISDataset
from aistore.sdk import Client
from aistore.sdk.multiobj import ObjectRange

AISTORE_ENDPOINT = os.getenv("AIS_ENDPOINT", "http://192.168.49.2:8080")
client = Client(AISTORE_ENDPOINT)
bucket_name = "images"


def show_image(image_data):
    with Image.open(io.BytesIO(image_data)) as image:
        image.show()


def load_data():
    # First, let's create a bucket and put the data into AIS
    bucket = client.bucket(bucket_name).create()
    bucket.put_files("images/", pattern="*.jpg")
    # Show a random (non-transformed) image from the dataset
    image_data = bucket.object("Bengal_171.jpg").get_reader().read_all()
    show_image(image_data)

load_data()

The class for this image can also be found in the annotations data:
Bengal_171 6 1 2

Translates to
Class: 6 (ID)
Species: 1 (cat)
Breed: 2 (Bengal)
Transforming the data
Now that the data is in place, we need to define the transformation we want to apply before training on the data. Below we will deploy transformation code on an ETL K8s container. Once this code is deployed as an ETL in AIS, it can be applied to buckets or objects to transform them on the cluster.
def etl():
    def img_to_bytes(img):
        buf = io.BytesIO()
        img = img.convert('RGB')
        img.save(buf, format='JPEG')
        return buf.getvalue()

    input_bytes = sys.stdin.buffer.read()
    image = Image.open(io.BytesIO(input_bytes)).convert('RGB')
    preprocessing = transforms.Compose([
        transforms.RandomResizedCrop(224),
        transforms.RandomHorizontalFlip(),
        transforms.ToTensor(),
        transforms.Normalize(mean=[0.485, 0.456, 0.406], std=[0.229, 0.224, 0.225]),
        transforms.ToPILImage(),
        transforms.Lambda(img_to_bytes),
    ])
    processed_bytes = preprocessing(image)
    sys.stdout.buffer.write(processed_bytes)
Initializing
We will use python3 (python:3.10) runtime and install the torchvision package to run the etl function above. When using the Python SDK init_code, it will automatically select the current version of Python (if supported) as the runtime for compatibility with the code passed in. To use a different runtime, check out the init_spec option.
runtime contains a predefined work environment in which the provided code/script will be run. A full list of supported runtimes can be found here.
def create_etl():
    client.etl("transform-images").init_code(
                           transform=etl,
                           dependencies=["torchvision"],
                           communication_type="io")


image_etl = create_etl()
This initialization may take a few minutes to run, as it must download torchvision and all its dependencies.
def show_etl(etl):
    print(client.cluster().list_running_etls())
    print(etl.view())

show_etl(image_etl)
Inline and Offline ETL
AIS supports both inline (applied when getting objects) and offline (bucket to bucket) ETL. For more info see the ETL docs here.
Transforming a single object inline
With the ETL defined, we can use it when accessing our data.
def get_with_etl(etl):
    transformed_data = client.bucket(bucket_name).object("Bengal_171.jpg").get_reader(etl_name=etl.name).read_all()
    show_image(transformed_data)

get_with_etl(image_etl)
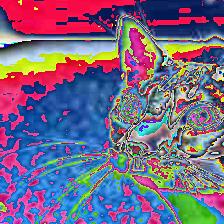
Post-transform image:
Transforming an entire bucket offline
Note that the job below may take a long time to run depending on your machine and the images you are transforming. You can view all jobs with client.cluster().list_running_jobs(). If you’d like to run a shorter example, you can limit which images are transformed with the prefix_filter option in the bucket.transform function:
def etl_bucket(etl):
    dest_bucket = client.bucket("transformed-images").create()
    transform_job = client.bucket(bucket_name).transform(etl_name=etl.name, to_bck=dest_bucket)
    client.job(transform_job).wait()
    print(entry.name for entry in dest_bucket.list_all_objects())

etl_bucket(image_etl)
Transforming multiple objects offline
We can also utilize the SDK’s object group feature to transform a selection of several objects with the defined ETL.
def etl_group(etl):
    dest_bucket = client.bucket("transformed-selected-images").create()
    # Select a range of objects from the source bucket
    object_range = ObjectRange(min_index=0, max_index=100, prefix="Bengal_", suffix=".jpg")
    object_group = client.bucket(bucket_name).objects(obj_range=object_range)
    transform_job = object_group.transform(etl_name=etl.name, to_bck=dest_bucket)
    client.job(transform_job).wait_for_idle(timeout=300)
    print([entry.name for entry in dest_bucket.list_all_objects()])

etl_group(image_etl)
AIS/PyTorch connector
In the steps above, we demonstrated a few ways to transform objects, but to use the results we need to load them into a PyTorch Dataset and DataLoader. In PyTorch, a dataset can be defined by inheriting torch.utils.data.Dataset. Datasets can be fed into a DataLoader to handle batching, shuffling, etc. (see ‘torch.utils.data.DataLoader’).
To implement inline ETL, transforming objects as we read them, you will need to create a custom PyTorch Dataset as described by PyTorch here. In the future, AIS will likely provide some of this functionality directly. For now, we will use the output of the offline ETL (bucket-to-bucket) described above and use the provided AISDataset to read the transformed results. More info on reading AIS data into PyTorch can be found on the AIS blog here.
def create_dataloader():
    # Construct a dataset and dataloader to read data from the transformed bucket
    dataset = AISDataset(AISTORE_ENDPOINT, "ais://transformed-images")
    train_loader = torch.utils.data.DataLoader(dataset, shuffle=True)
    return train_loader

data_loader = create_dataloader()
This data loader can now be used with PyTorch to train a full model.
Full code examples for each action above can be found here
References
- AIStore & ETL: Introduction
- GitHub:
- Documentation, blogs, videos:
- https://aiatscale.org
- https://github.com/NVIDIA/aistore/tree/main/docs
- Deprecated training code samples:
- Full code example
- Dataset